Chances are, the bathroom sinks throughout your house all have drain stoppers, also sometimes known as “sink stoppers” in them. These devices are extremely important, not only for keeping your sinks clean, but for preventing errant objects from going down your drains. They also make tasks like shaving easier. However, the longer those stoppers remain in your sink drains, the more grime they are going to accumulate, and eventually, your drain stopper itself will need to be cleaned. You may also want to take your sink stopper out to look for an item that accidentally slipped into your drain. Keep reading to learn how to successfully remove a drain stopper, and remember that for all the drain services you need, you can always count on our handy plumbers at All Pro Plumbing, Heating, Air & Electric.
5 Steps for Successfully Removing a Drain Stopper
- Step 1: Not all drain stoppers are the same. There are several types, including lift-and-turns, push-and-pulls, and pop-ups. There are also toe-touch stoppers, trip lever stoppers, and flip-it stoppers, but these are more for showers, so for the purposes of this list, we won’t be concentrating on them. Regardless of what type of stopper you have, however, you should see if you need tools before you try taking it off. Turn the plug on the top of your stopper with your finger, and pull. If this gets your drain stopper out, congratulations, you can disregard steps 2-5. If not, you will likely need to assemble some tools to complete the rest of these steps.
- Step 2: If you have not been able to remove your drain stopper by hand, you will probably have to go under the sink. Before you do this, it is important to remove any items you have stored down there first, as you do not want anything getting in the way or accidentally getting damaged while you are taking out the stopper. This is also safer for you, in case you accidentally slip during removal.
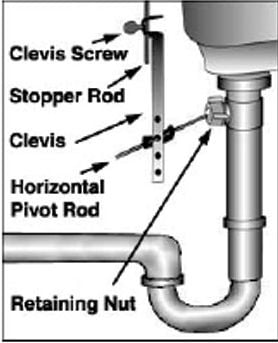
- Step 3: Next, take a flashlight, and look for the horizontal plunger rod that connects the strap to the stopper. This part will be connected to a vertical strap, and it will have several holes in it. After that, find the small metal clip that keeps all these parts together. Remove this part, keeping it some place safe for later, and make sure to note which hole the rod fits into, so you know how to put everything back together in the end.
- Step 4: After you have removed the horizontal plunger rod, find the pivot nut it is connected to and unscrew it. After this, you will need to take a bucket and place it underneath your sink, to collect any errant water that may come dripping out when the nut is unscrewed (and MAKE SURE your taps are not on, even a little bit, before you complete this whole thing.) You may be able to unscrew the pivot nut with your hands, and if this does not work, grab a pliers or wrench to get the job done.
- Step 5: Finally, after you have completed all the above steps, you should be able to pull your bathroom sink stopper out without any problems. Remember, things can definitely get grimy, so make sure you have gloves and other appropriate cleaning attire, especially for when you take out that gunky stopper (this is also why the bucket is so important—to catch any dirty water.) When you have completed all these steps, clean the stopper and/or retrieve what you are looking for in the drain, and just reverse 2-5 to put everything back.
Looking for more helpful plumbing tips or need to schedule service? Call All Pro Plumbing, Heating, Air & Electric now at (909) 500-8193, or fill out our contact form online.